Showing posts with label How To. Show all posts

Sunday, July 30, 2023

Meeting In The Air Southern Gospel on Piano


Meeting In The Air MIDI File

     This marks the 2nd new Southern Gospel song posted since re-starting this blog.  Meeting In The Air is an old old favorite.  I loved to sing this in church when I was a kid.  It's one of the songs I can clearly remember from church, from Uncle Freil playing, and from playing it myself.

    The song's original copyright was in 1925, and is currently under the Public Domain.  It was written by Mae Taylor Roberts.  According to Hymnary, the copyright notice originally contained this offer:  "This song may be had in sheet music at 25 cents a copy. Order from Mrs. Mae T. Roberts, 1554, East Washington, Pasadena, California."  Since that was nearly a century ago, I sincerely doubt she's still honoring her offer.
    I've looked for more information or songs from Mae Taylor Roberts, but couldn't find anything beyond the small amount Hymnary has.  If you'd like the lyrics, Hymnary offers 3 verses plus chorus.  I've seen it in the past with 4 verses, but usually consider Hymnary to be the most reliable source of hymn information.

    Speaking of verses, I took the road less traveled this time.  Most of the time, I'll do two or three verses with a chorus between each. This time around, I had an example to follow.  I recently found several decades-old videos of my uncle Freil playing.  This was one of the songs, so I had the rare opportunity to compare my version to his.  For his version of the song, he simply played the verses three times.  Didn't play the chorus at all.  It never occurred to me that could be an option; plus, I liked that a lot, so I'm following his lead and just playing three verses.  

    Also, not surprising at all... his way of playing Meeting in the Air is much better than mine.  I tend to play a very direct melody line.  Freil had a subtler approach.  He wound in and around the melody line, in ways that would never have occurred to me, lending his variations a much more sophisticated feel.

    With some effort (okay, a lot of effort), I listened to his version of Meeting in the Air over and over, working on learning how he did it.  Unless you're very familiar with Friel's style, you probably won't hear the difference.  But for those of us who knew him, it's there.  The first and last verses are my style.  The middle verse is as close to how he played the song as I can get.  The difference blurs a bit, because over time, fiddling with the arrangement, some of  his style blended with mine.  That's fabulous, because I'd love to be able to play more like Freil.

    Regardless, I'm happy with the arrangement.  I can tell what's mine and what's Freil's, and love the fact that even after all these years, I'm still learning from him.  

    The video itself is a whole other story.  I have a new (outdated, but new to me) cell phone, and struggled with the settings.  It has problems with the audio.  It sounds like it's playing underwater, with strangely distorted sounds, and halfway through the video the audio stops entirely.  My final attempt was with the lower resolution setting turned on.  It was the best version I'd played, out of several hours of trying to fix the video.  By that point my hands ached, and I was getting tired to the point of starting to play worse, rather than better.  So I took that final effort as 'best effort' and called it done.  The playing is fair enough, but the lower resolution makes the video itself disappointing.
    I'd like to fix the audio issue, or at least figure out what's going on.  But... the video plays with perfect timing, and I never use the original audio anyway.  I always use Ableton to record while playing, export it as a Wav file, and overlay the Wav on top of the original video's audio track.  It's cleaner than the original audio, with none of the ambient noise, barking dogs, etc.  So, the odd audio isn't an issue in this particular situation.  At least, not for making these piano videos.

        I've been working on this for a couple of months (or longer).  It would have been easy enough to do a simple arrangement in the key of C.  That's always been my wheelhouse.  But for these videos, I try to change up the keys a little, and offer greater variation in each verse.  With age and covid affecting my memory, it takes longer to get comfortable with an arrangement I like, and my ability to play it perfectly is based more on good luck, no matter how much I practice.  So, please pardon any errors.  The style is there, clearly enough that other pianists can take inspiration from the style and arrangement.  Aside from the actual video of me playing the piano... there's also a "how-to" video using Midiano (see sidebar link to Midiano) to play the song at normal speed, and half speed.  

    In addition to the how-to, the Midi file for Meeting In The Air is available on this page for download.  You can download the file, go to Midiano and play it, which comes with a variety of options that will help in learning to play the song.  You don't have to use Midiano, any Midi player is fine, but I don't know of any free player that can do everything that Midiano does.  Actually, I don't know of any better midi player at all, paid or free. 

     If you read sheet music, a pdf file is also available for download.  All the downloads are available for free, on this page.  (At some point I'll consider adding appropriate affiliate ads, maybe a "buy me a coffee" link, but as of this moment, haven't looked into them yet.)    But even then, there's no obligation, no charge to download.   Get the files, enjoy them, but if you share them, please credit me for the arrangement.  :^)


Saturday, July 8, 2023

Stepping On the Clouds: How to Play Southern Gospel Style


Click HERE to go to the original blog post with free downloadable Midi and Sheet Music.

     In the past week, the final piece of the puzzle dropped into place.  Music Notation 4 was the finishing touch.  In the original Grace Notes, there were multiple elements with each new song:

  • The actual video, playing the song on piano (Yamaha DG-640 back then)
  • A How To video, with sheet music and animated keyboard showing what keys to play
  • A free downloadable Midi file of the song
  • A free downloadable version of the sheet music

    That took a full toolbox of software (plus a keyboard).  Over the years, the Yamaha quit working for me, and was replaced with an M-Audio Hammer 88.  It's a beautiful keyboard with a great feel, but has no built-in audio.  Strictly a Midi controller.  It came with Ableton as the DAW.  The main computer was my Swiss army knife, but Ableton didn't play well with the other installed software.  It took getting a dedicated laptop to make Ableton and the Hammer 88 work consistently.  And even then, I wound up needing an external audio driver (Also M-Audio, as are the speakers.)  Ableton creates the initial Midi, Notation Musician cleans it up a bit.
    Originally, I used the Flip line of digital video recorders, and later a more sophisticated digital camera.  Eventually, cell phones improved to the point I now shoot the videos on my phone.  Nothing special, just a slightly outdated Android.  Got a cheap mini tripod from Amazon that has flexible legs.  It can wrap around handy furniture or fixtures so I don't have to worry about getting an odd angle or knocking it off a shelf.  Bandicam was my screen video recording software.  Did a good job then... does a good job now.  I've kept it through at least three computers, and it just keeps on working.
    For regular video editing, I use HitFilm Express.  My needs are simple.  I mainly use it to replace the live piano audio from the original video (with all the household noises, barking dogs, etc...) with a WAV audio file generated by Ableton.  I sync the audio and video by the simply watching my fingers on the piano, and aligning the audio to match the movement.  It's like having my own private sound studio, and easier than you'd think.

    The How-To videos were made using Midi Sheet Music, a freeware program that hasn't been updated in years and isn't compatible with Ableton's exported Midi files.  It converted Midi to sheet music, plus could play the sheet music notation with an animated piano keyboard.  And it divided the single-track keyboard into 2-track treble/clef sheet music.  Those were the only things it did, but it did them all-in-one and was dead-simple to use.  It wasn't pretty, but it did the job.
    Now I use Notation Musician to output PDF files of the sheet music.  It also splits the Midi files into two tracks.  Didn't have to have that feature, but it makes the sheet music look cleaner.  I can play the midi files and follow along in the sheet music onscreen, but lacks the animated piano keyboard.
    Lastly, I use Midiano to actually play the song (with the animated keyboard) for the How To video.  It animates the sheet music across the screen, has a gorgeous animated piano at the bottom, and drops played notes visually down the screen to show which keys are coming up in sequence.  Tons of customizing available.  Absolutely free.  Midiano is a sparkling example of brilliant design.  It's a fabulous learning tool, with more features than you can shake a stick at.  Did I mention free?
    I highly recommend Midiano.  Download my midi file (or any Midi file), load it into Midiano, and you can experience a whole new way of learning piano music.  It even waits for you to hit the next notes, before moving on.  You can see it in action in the video above.

    There's more here and there, but these are the basic tools I use.  Music Notation 4 was the last big piece.  With it, I can include the sheet music, and can replicate everything the old Grace Notes blog used to provide.  Since it's been so long between posting the actual 'live' piano video, and then today doing the how to video, I'm putting the new video here on this page.  Going forward, all four elements will be on a single post, so you don't have to search for every separate piece.


Music Notation 4 Sheet Music Print Function, and Making PDF Files Work With Google Blogger

     I mentioned in a previous blog the limitations inherent in Google Blogger.  It's great with images, and video, and linking to URLs.  Other files are kind of left hanging out to dry.  There's a workaround on Google Drive Direct Link Generator.  Makes it just a few easy steps.  I'd prefer that Blogger could natively handle the files, but this is almost as easy.

    With that said, the bigger problem has nothing to do with Blogger.  I've been looking for a way to convert MIDI files to Sheet Music.  I play by ear, and haven't read sheet music in about 50 years so writing my own would be more effort than I really want to do.  For years, I used "Midi to Sheet Music", and it was great.  Super simple, but anybody who wanted to learn my arrangements by music notation could do so.  When it quit working, there wasn't much of an alternative out there.  MuseScore had potential, but I didn't like the way it played the files, and it didn't seem to understand my "southern gospel" twang.  Music Notation played my stuff perfectly, but the free version was crippled so as not to print the notation out.  You had to buy the full program to be able to output the sheet music, and it was $90.  

    That's where I've been stuck for the last two months.  My son and his wife unknowingly funded the project when they sent birthday money last week.  Bought and downloaded Music Notation 4, and spent a few days exploring it.  Does more than I need, but the important part is that it DOES WHAT I NEED, and does so extremely well.  It's absolutely worth the cost.  If you click the link, it will take you to Notation Software's website.  If you decide to buy it, be careful to choose the correct program.  They have two, "Notation Composer," and "Notation Musician."
The former is a more complete program, and much more expensive.  The latter, Notation Musician, is the one I got.  For the record, I have no affiliation with Notation Software, and make no money for recommending them.  :^)

    A few weeks ago I posted my first new piano music video in years, and included a link to the midi file (thanks to the Direct Link Generator above).  Now I've got the sheet music for it:

Stepping On The Clouds Free Sheet Music

    I'll edit the original post with the video, so as to have the video, midi, and sheet music all in the same blog post, but wanted to include it here as a technical example of the link working properly, and how well Notation Musician handles the conversion process.  

    As an added bonus, it splits the left and right hands for me.  Not that I'm reading the notes, but watching what's being played while listening to it, it sounds like a fine job of separating the track into two.  Might not be following "The Rules According to Hoyle"... but well enough for someone to learn the song from it.

One more related link - If I choose to make a "How to Play" video like like the original Grace Notes blog did, Music Notation would work but Midiano includes an actual piano keyboard on the screen, so you can read the music and watch the keys all at the same time.  And speed or slow the playback as desired, which makes a great learning tool!!  
    (NOTE:  Today I figured out how to put an image and link on the sidebar, now you can click on the image and go directly to Midiano!)

Thursday, June 22, 2023

VLC Media Player Transfer VHS to Computer

     In the last post, I described the steps that took me from failing with OBS, to succeeding with VLC.  In this post, I included the step by step images that actually worked for me, and a portion of the resulting video.  Portion, because the test video recorded for well over an hour.  When I played it back, the entire duration played fine.  Audio stayed synced.  Image quality looked great (for a plus-or-minus 30 year old VHS tape).  It was satisfying, gratifying, after the entire journey from "Why isn't this working?" to "Look, Mom!"

For the record, here's VLC's official site.  VLC is completely free, and a very "swiss army knife" of a video player.  Versatile, fast, and lightweight.  I've used it for years, but even so didn't realize it could capture video until a year or two ago.  It's sort of 'hidden', unless you explore the menus.  And VLC could do with some actual documentation.  But I can't complain.  It's free, works great, and solved the problem.

    Quick note about the video recording - I played with some options that should have shown the video as it played, while recording.  Nothing worked exactly right.  If I chose the "Play" option and recorded from there, the video was visible while recording, but would only record AVI, which has a size limit.  Ultimately, I had to follow the steps, but take it on faith the video was recording correctly.  Once I hit the "stop" button, it finalized the file.  Only then did the finished file play.  As you see, it worked, I just couldn't see the actual video while it was recording.

    I still strongly recommend visiting "How to Record Screen with VLC."  By the time I found this site, I had a lot of the puzzle pieces.  This was the website that put it all together and showed a wide variety of ways to record.  But for a quick visual shortcut, the images below shows the process that actually worked for me.

Above you see VLC's startup screen.  

Next, under the MEDIA menu, select "Open Capture Device"

Here, under the Capture Device tab, make sure "DirectShow" is selected for Capture Mode.  I'm using AV2HDMI for the capture hardware that connects the VCR to my computer.  For me, the Video Device Name was "USB Video."  The Audio Device name was "Digital Audio Interface (2 USB Digital Audio)."  Your devices may be different, depending on your capture device and your computer setup.

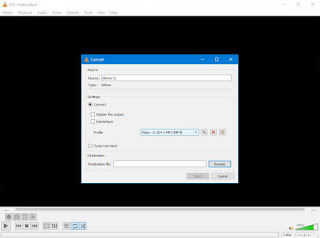
Where it says "Play" near the bottom, click the dropdown arrow and select "Convert."

The "Convert" popup should appear.  Source was automatically set for "dshow:\\", I didn't have to choose that.  I did not select "DeInterlace."  Thought it might be needed, but it worked fine without.  I did try the "Display the Output", but still couldn't see the video as it was recording.  The recording worked, with or without trying to display the output, it just didn't seem to make any difference either way.  Under "Profile", I selected "Video - H.264 + MP3 (MP4)."  There was a higher numbered Codec for H.265.  I tried that, but it embedded the audio in a way that my players and video editors could not use, so I went back to H.264, which works just fine.  

The only thing important here is that the "Browse" button is highlighted. Click on it to open the save window.

From here, you select the target directory you want to save the video to, name the video, and type ".mp4" at the end of your filename.  Adding .mp4 seems to be all you need to tell it what format to save in.  There are other options, but mp4 is the only one I wanted.

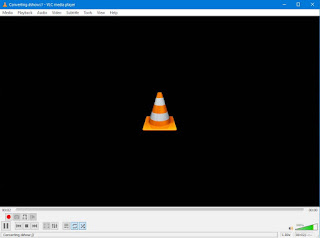
Now you're back to the "Convert" screen with your destination file selected.  Click Start.  


Now you're on the recording screen.  I know, it's blank.  That's all I could see.  But the red dot was depressed, and the counter was counting up.  At this point, I took it on faith, and went to eat supper.  How did the video turn out?  Check out the clip above!

    For the record, I (accidentally) recorded an hour and 13 minutes for the test video.  Left it running, and forgot it was on.  Most of the video is very old children's cartoons recorded from broadcast television.  Rather than bore you with all of it, I took the first six minutes because it was me... playing 30 years ago.  It's like a window into the past.  And a chance to see how my playing then compares to my playing now.

    Honestly, I think I played better back then.  Still made mistakes, but my playing was more certain, and felt more 'full of joy'.  I've learned a lot since then, and can play things now that I couldn't back then.  But it seems to be missing some part of what I loved about the piano.  Food for thought.  Maybe I need to simplify, and get back to just having fun with it.


Sunday, May 21, 2023

Google Blogger Housecleaning: Customizing Blogger

    Writing kind of a trivial post today.  At least, it's trivial in the large scheme of things.  It was a big deal for me, anyway.  :^)

    Back in January when the idea of starting Grace Notes back up was gaining momentum, there was a huge speed bump that just about shut things down before it even had a chance to start.  The "cookie consent" situation.  There were a log of changes to manage, new things to learn.  Last time I was paying (a lot!) for hosting and using Wordpress.  This time we're taking the budget express.  Google Blogger is free, and you can have a BUNCH of blogs if you really want to.  Google charges $12 per year for the URL domain, and $12 for Google Office.

    The URL name is a compromise.  It's not the original one for Grace Notes, but it is my overarching URL ever since Galaxy Quest came out.  Crewman6 was the redshirt who lived, and it's always been an inspirational name for me.  Google Office gives me a custom email, more storage for whatever files I use on the blog.  Some other benefits I haven't looked into yet.  Pretty much, this is everything I need to manage Grace Notes.  WordPress was a great blogging platform, and was more versatile than Blogger.  But it was a heck of a lot more expensive to maintain, and the hosting company just kept leapfrogging the rates up every year.  As things stand, I pay about $156 per year for this setup.  The old Grace Notes, with Word Press, hosted on a proper site... was costing nearly $500 per year by the time I pulled the plug.  Blogger is far more cost-efficient for me.

    At some point I'll turn Adsense on, but it's not a big goal here.  Grace Notes cost much more to maintain than it ever made me last time around.  If it can pay the $12 per month fee this time, I'll call it a successful hobby and enjoy it.

    Now we get to today's subject.  To properly manage the cookie consent requirements, I had to paste some code into the Blogger theme.  I also pasted in some custom lines for a couple of features that weren't easily available on Blogger.  Not really a skill of mine, but I did manage to follow a couple of guides.  Afterward, the initial menus for Theme management were gone.  There was a comment about some features not being available now.  I took that to mean I could no longer change the advanced features of my theme, without reloading the base version, making my changes, then re-inserting whatever custom codes needed to be done manually.  For a few months I looked for other theme templates off-Blogger, but didn't find any that seemed worth changing the whole blog for.

     With that in mind, I've been leaving a lot of 'tidying up' undone for months.  Mainly the link colors, and making a custom Banner. Woke up this morning, and it felt like today was the day to finally fix all that.  Found some websites that gave pointers on changing the link colors and sat down to puzzle them out.  The first one wanted me to start off on the Theme tab.  As usual, the first line read "Theme Preview is currently unavailable."


    If you're familiar with Blogger, at this point you've probably realized I've been mistaken this whole time.  The ability to customize my theme was always there.  As was the Advanced options.  Maybe something changed, maybe I just read it wrong.  I was clicking the down-arrow on the orange button to get the drop-down menu.  Took me ages to realize I just had to click on the orange button ON THE WORD "Customize!!" in order to get to the customization options. Now that I know, fixing the link colors was very easy.  

    It was a bit of work to get the banner done, but at least it was legitimate work, not a figment of my own imagination.  My previous keyboard was a Yamaha DG-640, and was a grayish-silver color.  That worked really well against the black background of the blog screen.  The Hammer 88 was more difficult.  A black body on a black background doesn't stand out a lot.  I played with it, even tried to use an external image for the background, but it didn't come out perfect.  It will stand for now, I do like it a lot.  But some day in the future, I'd like to have better lighting so the keys will be a clean white. Today's lighting was partly sunlight from a window, partly incandescent bulbs from a ceiling fan light, and the keys aren't consistently white.

    It's been a learning process, and a matter of finding the right software all over the internet.  I started with PixLR, used Irfanview, and tried several online tools before getting something that worked.  At the moment, I'm calling it a day, and an improved banner will have to be a project for another day.

Saturday, May 6, 2023

Used Laptop for the Hammer-88: USB Problems

     Just an update based on a simple fix for a long-standing problem.  Going way back, I originally had one very good desktop to do everything.  It's 6 or 7 years old now, and still good, but no longer great.  Over the years, some things started conflicting with others.  The usual victim was system audio.  

    This caused the biggest problem with Ableton Live Lite and M-Audio's Hammer-88 keyboard.  Sometimes the audio drivers would quit working randomly.  The  most consistent and annoying villain was when Microsoft did a Windows "update/upgrade."  EVERY SINGLE TIME.  I only know a couple of swear words, but I've used them many many times at Windows updates.

(Warning - Upcoming Rant)
    The problem could sometimes be fixed easily (usually the random occurences.)  Other times (looking at YOU, Microsoft...) it could take days or weeks to get the audio to working reliably.  Sometimes it took so long, another update would come out just days later and we'd start all over again.
    Helpful Hint:  This website provides a link to a trouble-shooter that could fix most of the audio problems in moments:
https://support.microsoft.com/en-us/windows/fix-sound-or-audio-problems-in-windows-73025246-b61c-40fb-671a-2535c7cd56c8
    Yes, I'm aware it's a microsoft link.  That doesn't make me like them any better, since it was nearly always their OS updates that triggered the problem.  Just the same, this is the first thing I try when the audio stops working.  Click the link on the page and allow the app to test for problems.
    The weird thing is, it always reports "no problem found", and starts suggesting random things to try... but actually fixes the issue, at least most of the time.  So I click the "Open Get Help" button, let it do it's thing, then close the window after it reports failure.  And that's usually all it takes.
    Other times, it's as simple as checking "Sounds", going to the PlayBack Tab, and finding that the update has totally played havoc with speaker output assignments.  For some reason, it would reassign a new random output as the default.  Sometimes it would go to a legitimate speaker, like the one built-in to the monitor.  Other times it would choose options that had no output at all.  Re-setting the correct speakers as the default option will typically fix the audio, but sometimes it has to be reassigned as the default with every reboot.  Eventually it sticks, until the next system update.
    The worst ones... the mystery issues with no reliable fix... were the worst. This is part of the reason I quit playing.  It was so consistent, there were so many times I just wanted to 'play the piano' but couldn't, I gave up for a while.
(Rant Over)

A Dedicated Laptop
    In a final attempt to solve the problem, Monique found a used laptop on an Amazon lightning sale.  It's an older HP EliteBook.  Old enough it was originally sold with Windows 7 installed.  It's running Windows 10 now, but that's pushing things.  I don't install extraneous software.  Primarily Ableton, plus CCleaner and Irfanview.  And my favorite browser, Vivaldi. 
    Ableton 10 Live Lite - dedicated to the Hammer 88.
    CCleaner for it's utility toolkit and easy system cleaning. 
    Irfanview for the times I need a screenshot. 
    Vivaldi mainly because I used to use Google Drive to swap files.
    Our working space is tight, so the keyboard is on a wall-mounted shelving system, right beside the door.  It's easy to bump the keyboard while walking past it, and I thought maybe too many impacts caused the issue.


The Ultimate Fix: A USB Hub
    Eventually I realized the problem was the USB port the keyboard was attached to.  The laptop only has 3 USB ports, one to an external audio driver (the Air/Hub, by M-Audio), one to the keyboard, and one for the mouse. Not enough to go around with one having intermittent problems.  We had a 7-port powered hub.  I tried it, but for some reason when the laptop is powered down the hub still provides power to the Hammer 88 and to the mouse.  I didn't want the keyboard to be powered up non-stop all day long.  Seems like that would wear the electronics out faster.
    For about $15.00, we found a great USB hub on Amazon, by Sabrent.  It's powered, has 4 ports, and each port has a dedicated on/off switch, with a light so you know which ones are on.
    Now the keyboard and mouse are connected through the hub.  I also keep a USB memory stick on one port, for trading files between computers.  And the fourth port, just because it was available, provides power to a VCR-to-Computer converter.  Only the ports in use are powered up.  And when the laptop is turned off, I turn off the hub ports as well.  
    Now it works great.  I can play the keyboard reliably, at any time.  And turn the peripherals on/off as needed.  It's amazing when things function like you need them to!!

    With this setup it worked most of the time, but frustratingly there were still days it didn't.  Sometimes on a reboot, the laptop would not communicate with the keyboard.  Occasionally reconnecting the cable between them, but not always.  I started worrying that after all these years of not getting to use it, maybe the keyboard was aging, connections failing, who knows. 

Friday, April 28, 2023

The Technical Side of Grace Notes: Midi and the Missing Sheet Music

     Still celebrating the first brand new posting of my own piano arrangement (Stepping On The Clouds).  Part One of this "Technical Side of Grace Notes" article dealt with how I learn a new song and the process of creating the finished video and blog post.  Today we'll finish with getting the Midi file on Blogger, and acknowledging the missing sheet music.  Then, I'll have a solid reminder against the future and my failing memory.  :^)

    In the previous post, I explained how to save all three elements from Ableton.  The full SET, so I can always re-create the Midi and .wav files.  Just in case.  Plus, of course, the actual Midi and .wav files.  We already applied the .wav file to the video, for a clean audio track with no ambient noise.

    The Midi file I do for it's own sake, for those readers who want it.  Either just to play with Midi on their own setup, or to use Midi as a controllable process for learning how to play my arrangements.  If you downloaded the Midi in order to learn the song, I strongly recommend using Midiano.com as a teaching tool.  It plays my music more "true" than just about anything out there.  It has a visual keyboard you can watch to see the notes as they fall, and the ability to slow down the playback for easier learning.  Plus many other options.

    Not that I have any illusions about my skill level.  There are a ton of musicians on YouTube that put me to shame.  But as my Mom said, there are also plenty of people who are at the perfect level to learn and appreciate what I can offer.  So I don't let all those better players prevent me from putting my two cents in!  

    I'd call my complexity level simple to middling.  There are at least three sites out there that link to my playing as the ideal way to play a specific song.  One of them is even using my sheet music AND my video (it was for Amazing Grace). 
    They were kind enough to give full credit, and to rate the complexity at "Intermediate".  That's higher than I'd expect, and it's very kind of them to share my music.  It validates Mom's advice.

    The real struggle with the Midi wasn't in creating the file, but in getting it onto Blogger in a way that's easy for readers to download.  On the original Grace Notes, I was paying a... large percentage of income... to have a dedicated site to use Wordpress, which I loved.  It had a lot more versatility than Blogger.  But hosting the site got drastically more expensive every single year.  Now I use Google Blogger.  Blogger itself is free.  And a basic Google Workspace is only $12.00 per month.  I still have my custom url, Crewman6.com, and that's a low once-a-year fee.  

    To get to the point, Wordpress offers many options, and you can easily attach just about ANY kind of file for download. Blogger, oddly, only offers Video, Images, or links to other web pages.  Having other filetypes, like Midi, requires a workaround. So here's the gist of it:

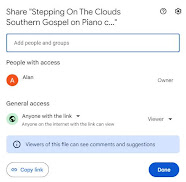
    Put the Midi file in your Google Drive, give access to anybody with the link, and copy the link.  Then go to Google Drive Direct Link Generator.  Follow the instructions there to paste your link, then create a direct download link to your Google Drive file.  This is extremely important.  If you try to link to the URL generated by Google Drive, it will open an entirely new webpage, loading it in OVER your blog post.  Then it will attempt to play the midi file in your browser.  Then it will tell you the browser can't play that file, and offer to let you download the file.  THEN you can finally select to download the file.

    That's a huge pain, and the reader winds up on a completely different page, no longer on your post.  Using Google Drive Direct Link Generator is awesome, and free.  It lets you put the modified link on any text or image in your Blogger post, and anybody who clicks the link will be able to simply download the file.  I like choosing where to save downloaded files, so use the "Save As" option.  You might have your downloads default to a single directory for all downloads.  Either is fine.  The point is, the viewer easily downloads the file, without disrupting their reading.  

    Next up, those missing sheet music pages.  On the old Grace Notes blog, I used MidiSheetMusic to both play, and generate sheet music.  It did a great job, but is outdated now and doesn't work with any Midi generated by Ableton.  (Resaving from another Midi player doesn't help either.)  Now I'm in the process of finding another program that can convert Midi to Sheet music, and allow me to make image files of the sheet music.  Originally, those images were saved into .pdf files and uploaded to the blog for anybody that wanted to download.  That's still the plan, but it's been difficult to find software that does exactly what I need.

    I thought I'd solved the problem with MuseScore, which is free to download, converts Midi to sheet music, and allows printing.  Unfortunately, my play-by-ear style seems to confuse Musescore, and when it plays the music back, it completely messes up the order of notes.  Especially if they're played very close together to accentuate the melody.  You know... kind of like a "Grace Note"...  

    Not sure why it struggles with that, because it's sleek and sophisticated software that I like a lot.  Unfortunately, it's not the only one that struggles with my midi.  So far the rule is, if it understands my playing properly, it either offers no sheet music generation, or the function is only available with purchase of the full software.  All the free players that generate printable sheet music have been unable to play the files correctly.

    My favorite, Midiano, plays my stuff perfectly, but as of yet, has no option to create sheet music.  That's not really what Midiano's about, anyway.  My second favorite is a paid software called Notation Musician.  They have a free version, so I KNOW it can play my music perfectly, exactly as intended.  They also generate sheet music.  But the free version does not allow print output.  Yes, I could do screengrabs page by page, but I want to do this the right way.  I'll save up until I can buy the software properly.

    That said, it's $90.00 to purchase, and our budget is very finely balanced to buy food, fuel, pay insurance and taxes.  There's not a lot of leeway for fun things that don't 'earn their keep' monetarily.  So it may take a while to buy Notation Musician.  When I do, I'll go back to any posts as needed and add sheet music downloads.  For now, you're welcome to convert my Midi into sheet music in any way that works for you.  Again, I recommend Midiano.  It's an amazing learning tool, and one of the few players that interprets my playing exactly as intended.

And that's where I'm at, in terms of continuing on Grace Notes.  The last two 'technical' posts were intended to act as memory storage, in case I forget how to do these steps, but I published them just in case any of it might be useful to someone else.  If anybody other than my wife or my mom read these last two posts in their entirety, I'll be totally amazed.  :^D


Wednesday, April 26, 2023

The Technical Side of Grace Notes: Creating the Video and Sharing the Midi Files

     Yesterday marked a huge milestone here.  I finally posted my first brand new page of my own arrangement on piano, with a downloadable midi file of the piano arrangement.  It's been months in the process, learning and relearning all the associated elements. Writing this post is both a celebration... and my crib notes on the general process, in case I forget how to do it all again.  :^)

    I use M-Audio's Hammer 88 to play the songs.  I'm a strictly 'play-it-by-ear' type, so there's no music notation, no hours scribbling my music on notes.  Just sounding out different ways of playing, trying alternatives, and bit by bit designing an arrangement that appeals.  Once the idea is in my head, the hard part is memorizing that arrangement, and practicing until I can play the song (nearly) perfectly.  

    I'm in my 60's, and Covid really messed up my focus and comprehension.  It literally took 3 months to be ready to record.  Then stage fright kicks in.  Hours of playing/recording on Sunday.  More hours on Monday.  Tuesday I sat down, did a practice run-through, and the second attempt was as close to perfect as I'll probably ever get.  So that's the video you see.  (The song in this case is "Stepping On The Clouds.")

   Ableton Live Lite 10 came free with the Hammer 88.  So that's how I play and record the music.  Nothing fancy.  Once Ableton was installed and working, and a few technical set-up issues resolved, it was ready.  To record, I click the round "Record" button, start playing.  When I make a mistake, click "Stop", then "Play", then "Stop".  From trial and error, this activates a blue bar on the midi recording track, which I can then click to make Ableton's notation window pop open.  Click anywhere on the notation (inside the window that just popped up).  Select All (hold down CTRL and type "A".)

    Then I hit the DEL key, and for good measure, also hit the Backspace key.  Now it's a clean slate again.  Click the "Record" button again, and start playing.  Once the whole song is recorded satisfactorily, stop the recording, open the notation window and select All again.  
        {Without selecting ALL, the EXPORT features stay grayed out and don't activate.}

Then, under the FILE dropdown menu, first save the entire process as an Ableton Set (.als file).  Next, still on the File Menu, select EXPORT Midi, and save the midi version of the song.  Lastly, STILL on the File Menu, select EXPORT Audio.  I like to save the file in a ".wav" file format.  Mp3 is more popular, but Wav plays back at a constant speed.  It's not compressed so you can reliably count on the bitrate being stable.  I set it at 44000, 32-bit, and select "Normalize."  It's best if you first set your audio levels to not go over 0 decibels.  If the audio levels go into the red zone, it's set too loud.

    If it's time to record the video as well, I like to start recording, and keep playing even when I make mistakes and have to start over. (Tripod tip: Make sure you're pointing at the piano and frame the image as nicely as you can.  Don't forget to remove unsightly elements like the trash can under the keyboard...)
So, don't stop recording the video.  Keep recording nonstop, through every attempt.  There's a clear visual cue because every restart, the Ableton track needs to be stopped and reset before starting to play again.  When a good recording is achieved, upload the video to your computer.  To find the beginning in-point when editing, start at the end of the video, and scrub backwards until you come to the starting point of your perfect rendition.  Delete all the 'bad' footage in front of that, trim the end a bit if needed, to get your perfect video ready for audio.

    I use HitFilm Express to edit.  It's a free video editor, does a good job, and was easy to learn the bare minimum to create these videos.  Having already imported the video and trimmed it to just the 'good' part, now IMPORT the .wav file.  Drag it to the track just underneath the video.  You should see the video track, including the audio that recorded on the video track, PLUS the .wav audio file you just dragged under the video.

    Make sure both audio tracks are active.  Play the video, and see how close the two audio tracks are to playing in sync.  Make note of how close, which one starts first, then DRAG the .wav left or right to align with the video's audio track.  It's like lip syncing.  You may have to expand the visible track range, to give finer control over how much you move left or right.

    Do this until the Video audio track and the .wav audio are perfectly matching.  Then UNCHECK the video audio.  It's a little speaker symbol on the left.  Play the video again.  Now only the .wav audio track should be playing, and it should be perfectly synced with the fingers moving as they play the piano.
NOTE: if the .wav needs to move farther left than the video track will allow, select all and drag everything to the right to give yourself a bit of working room.

    Once the video and .wav are synced and the original video audio turned off, trim the ends again if needed. If both tracks aren't fully left-justified to the 0:00 starting point, select All and drag them to the 0:00 time marker.  Export the video as an mp4 file on your hard drive, and upload the video to YouTube.  On Blogger, it's easy to click the video button and select your YouTube video for insertion on the blog post.

I treat the audio this way to clean the original video-recorded audio.  Audio recorded directly in your video (I use my cell phone) is fuzzy, and picks up all the ambient noise.  Dogs barking, phones ringing, people talking... the .wav created from Ableton is crisp, clear, and clean of ambient noise.  It's like you recorded in a studio, with proper microphones.

This is a good stopping point.  I'll finish up in the next post.  We'll take a look at getting Midi onto Blogger in a way that's easily downloadable.

Saturday, April 22, 2023

Freil Thrift on Piano; from a 30-year old video Using AV2HDMI!


    I've been tearing my shed apart trying to find old recordings of my uncle Freil playing piano.  This VHS tape is over 30 years old, so it's not perfect, but it really means a lot to hear him play again!  I've found several others, but this is exceptional.  Nearly 25 minutes of video with Freil playing, and there are quite a few songs I don't have recorded anywhere else.  The video quality is rough, the tape is stretched, and the VCR's auto-tracking couldn't compensate enough.  But this may be the only surviving copy, and I'm grateful it works at all.

    The search for more recordings is just about over.  I've gone through nearly every box that could possibly hold any more.  Haven't found the Hi-8 tape I was actually hunting... but did turn up some audio cassettes and vhs tapes. Even got my hands on a couple of record albums he played on.  

    This videotape was recorded somewhere between 1990 and 1991.  Maybe on multiple days.  It wasn't made by me, and I have no recollection of how it came to be in my storage.  It's an awesome video.  The quality's not great... probably a copy, but more importantly, the tape is about 33 years old at this time.  VHS wasn't meant to last this long, way back then nobody knew for sure how long it would hold up.  It certainly hasn't been kept in optimal conditions.  Most of those years were in a box in a shed.

    As a result, the quality would be unacceptable, had it not been for the unique and irreplaceable nature of the subject.  For a few weeks, I couldn't even test it out.  The old digitizer (EZCap) that worked years ago no longer works.   The computer identifies it as attached hardware, but I couldn't find any software able to use it.


    In a previous post, I mentioned a YouTube guide by Jumble that explained an inexpensive setup to digitize videotape. It involved an RCA to HDMI converter called MINI AV2HDMI, and a small video capture device that converts HDMI to USB.  Everything else I already had, or was available for free (the OBS "Open Broadcast Software".)  OBS is way over my head, but Jumble explained the basic setup in his video.  Once it was all connected, it still didn't work, but a quick Google search fixed that.  Hint - check your windows privacy settings.  I had all related settings for Windows Webcam turned off.  As simply as turning on permissions, and it was recording video.

    Beyond that, the resulting video files had an odd echo effect.  The audio was being mixed back into itself.  I turned off the desktop/mic volume in OBS, and it worked perfectly.  Or, at least as good as the videotape itself was.  Repairing the damage of years was beyond me.

    The result is a fabulous memory of some of my favorites.  I hope you can forgive the inconsistent video quality and enjoy the music!

    IMPORTANT NOTE!!!
OBS worked great... once.  I didn't use it again for a few weeks, and the next time I tried to use it, there was NO AUDIO.  After days of googling, struggling to learn, trying different things, I went looking for other solutions. Here's the step by step process that finally worked: VLC Media Player Transfer to VHS    


Sunday, February 12, 2023

Finally Solved the Cookie Consent Riddle!

 I've been struggling with the whole European Union Data Protection (EUDP) Regulation... the Cookie Consent requirement, and by extension the California Consumer Protection Act.  It's easy to understand the need to protect everybody's privacy.  It's not so easy to understand the technical procedures to meet the requirements.  I'm a little more disgusted with government in general after all this.  If they're going to make a law requiring compliance, it should be built into the process.  Not laid on the end-user, many of whom, like myself, just want to write and lack all but the most rudimentary under-the-hood skills.  We're end-users, not professional programmers.

    I'm reasonably intelligent, but didn't want to spend weeks learning website code.  Especially when the advice on the internet is confusing, often incorrect, and overwhelming.  Or hidden behind a paywall, or a membership requirement.  Just at the time you think you learn something, you realize that's just one step, and then you have to learn more to implement another step.  Then you find out what you thought you knew was wrong, and you have to go back a few steps and start over.  It's been frustrating.

    In my last post, I shared a conversation with ChatGPT, asking for advice about how to comply with the cookie consent laws.  The chat occurred on Friday.  By Sunday evening (tonight) I've achieved conformity.  At least, as far as complying with the requirements.  Using the AI's advice as a springboard, I've learned what's actually needed, and how to approach it.  It's not that ChatGPT gave me the exact answers to my questions.  Rather, it gave me enough knowledge and understanding to find my own solutions.  And that's all I needed.  Just some honest, useful, advice.

    To begin, I wrote a Privacy/Cookie Policy page.  I learned the difference between writing a POST on Blogger, and writing a PAGE.  Learned how to use a widget under the layout tab, in the HEADER section, which gave the blog header tabs, in order to have my PAGES easily accessible.  Learned enough to follow (simple) directions from websites that provide the cookie consent popup.  Figured out how to access the HTML code from the Theme tab, and where to paste the popup code.

    Additionally, I learned that many of those "help" websites don't work.  It took trying several, and tampering with the HTML code for the site Theme (the look and feel of my blog, provided by Google).  I had to sign up for several services before finding out that the code they provided didn't function.

The site that worked for me, CookieYes, required a signup as well.  They offered paid services, but lucky for me they have a free service that worked nicely.  And included a tracking page, so you can track the consent record by IP address and date.  (Yes, apparently you have to provide this in case Big Brother wants proof that you're properly getting consent.)  To be honest it did a lot more than I expected, automatically.  I had to sign up first, making sure I chose a FREE service, not a TRIAL OFFER.  (Yeah, I picked the wrong one at first.)

Since I have some old blogs on Blogger, I'm not sure if they fall under some kind of umbrella, or if I'll need to do each one uniquely.  But there's no pressure, because I don't plan on using AdSense on any of the others.  I'll figure all that out another day.

Unlike some of the sites that offered free popup services, CookieYes' popup actually... you know... popped up.  I had to give my own consent to view my blog with the cookies.  For added confirmation that it's working, their stats page actually tracked when I clicked the approval button.  It's SUCH a huge relief to finally understand what needed to be done, and know that it's actually working!


Saturday, February 11, 2023

Jump-Starting Grace Notes: Surprising Solutions

 In the previous post, I was (honestly, ranting) explaining about the difficulties of installing a cookie consent widget into Google Blogger.  I've learned a lot about how to do it, but the more I learn, the more it seems there IS to learn.
    The solutions I've tried so far haven't worked.  But even minor progress is still progress, and I'm still trying to figure it out.  Yesterday, a good friend (Thanks, Eugene!) gave me the most amazing suggestion... ChatGPT.

    I'd never heard of it.  If you haven't either, it's an AI that you can freely talk with (like talking with someone on a forum, but more polite).  Ask questions, and in a reasonably natural writing style, it will do its best to answer.  It felt like I was talking to a very smart, and very polite, person.  The suggestions it offered seemed useful and well-thought out.  If you're curious, below is a transcript of the conversation we had:

    I asked, very specifically, how to add a cookie consent widget to my Google Blogger website.  Here's the result.  (My comments are bolded to make it easier to follow)

Sunday, February 5, 2023

Ableton Live 10 Lite Export Midi Clip Grayed Out

 Ran into a new snag, and solved it, both on the same day.  That's rare enough, but in this case, after failing to find a fix with Google, I solved it accidentally.

While going through Google, found some solutions, but they must have been obsolete.  The same context menus on my window didn't have the same options.  It sort of made sense that maybe the midi track needed to be selected, but none of the section's I tried to select made a difference.  I was mainly trying to select by right-click, and then looking for the export midi option.  The context menu never changed.  The "File" menu drop-down offered "Export Midi Clip", but it was grayed out.  

Skipping a lot of in-between steps, at one point my finger twitched, the mouse happened to be gliding over the exact right location, and the entire midi track showed up on the bottom row.  After the track is visible, the main "File" dropdown menu shows"Export Midi Clip" in dark text, no longer greyed out.  I tried saving a midi file, and it worked perfectly.

So here's what's been working for me:  I play from the Hammer 88, and record in Ableton.  Or, load a "Live Set" from the hard drive.  Then I play the melody.  Not long, just enough to hear and confirm it's there.  THEN, on the column with your active voice (in my case, the MiniGrand_64), left click on the row with a "square" symbol (See images).  The song track will show up at the bottom, with the red squiggly line.  Now, you can select the drop-down menu "File", and Export to Midi will no longer be grayed out.  I'm not sure if you should select the entire track (CTRL-A) before exporting, it seems to work whether you do or not.  But it's possible selecting only a portion of the track will only export that portion as a midi file.


And... Google Drive

Kind of a side-issue here, but as long as I'm keeping a journal of my learning experiences, I finally figured out Google Drive.  It was stupidly easy, once I quit trying to overcomplicate things.

Due to audio conflicts on my desktop computer - Youtube, several games, Ableton, Windows 10 didn't want to share resources - I wound up getting a small laptop computer that was dedicated to running Ableton.  (Yay for Amazon Lightning Deals on used computers!)  While that pretty much solved the ongoing battle with audio drivers and hardware settings, it meant file transfers between computers took an extra step.  Tonight it finally hit me, no need to do anything fancy.  Don't have to 'install' anything stand-alone.  Just log in on a browser and drag files into Drive.  

Can't believe all that time I've been using USB sticks.  

Wednesday, January 25, 2023

Learning on the Hammer 88 and Ableton Live Lite 10: Ableton Compatibility Problems

   After a couple of years away from using the Ableton and the Hammer 88, I'm having to learn pretty much from scratch... and never understood that much in the first place.

  All I really want to do is record my piano playing to computer, at the same time as recording a video of my hands playing the song.  I can't just record the song to video and upload to Youtube because our home has 3 dogs, and all the associated noises and distractions most homes have.

  The plan is to record MIDI via Ableton, then export it as music to a WAV file.  WAV, because it's uncompressed and can play without the inconsistencies you get in mp3.  While editing the original video, I'll overlay the WAV, sync it to the original audio, then delete the original audio track.  The finished product gives me a nice "studio" rendition of the music, removing all the 'live' household noises.  (I've done this in the past, with a Yamaha keyboard providing both MIDI, and actual Audio.)

  My problem is that Ableton Live Lite 10 is over my head, and overpowered for me.  It has a steep learning curve.  On the other hand, it came free with the Hammer 88, and can definitely do the job.  There's just so many little bits to figure out.  It took a lot of time way back when, learning all the little details of setting it up, getting actual audio to come out of the computer; making the MIDI input work, learning to record... a whole bunch of time spent just setting things up.  My desktop computer is a good one, but trying to use Ableton, edit video, play games, and "do it all on one computer", it was struggling to keep compatibility with everything.  

    And EVERY SINGLE TIME  Microsoft updated my computer, it force-switched my audio device to either produce NO audio at all, or it changed the output to a second monitor that wasn't even powered on!! 
In most cases, my games had great audio, YouTube and other audio sources had NO audio, and Ableton/Hammer88 did not work AT ALL.  I'd try to change things back, and the settings kept reverting back to the NON-working mode.

  Then it would take weeks getting all the audio on the computer to work together again, and usually Ableton was the hardest part to fix.  I only know a couple of curse-words, but I was using them both on Microsoft non-stop.

  After months of anger management issues, Monique bought me a small laptop, dedicated to ONLY running Ableton.  That solved all the audio driver issues.  I don't remember all the steps it took, nor the audio drivers and add-ons that were tried.  Eventually it all worked again.  I saved the settings as an auto-booting default every time the computer powered up.  One thing that really helped was getting an external audio driver, the M-Audio Air/Hub.  It was a reasonable price, and fixed most of the problems.

  Finding a nice "Piano" setting that I like has been difficult.  Some are great, some not, but they all struggle to reach the volume I need to hear.  I'm losing my hearing, so the volume needs to be loud.  But when it's loud enough for me to hear, the audio "redzones".  Tonight I discovered a solution.  Might not be the correct solution, but it works, and I'm satisfied.

  First, choose a piano that's naturally loud - the MiniGrand x64, with setting 16: Always Loud works for me.  It's kind of tinny, but with all the volume settings maxed, I can hear it just fine.  And yes, Ableton Master Output volume does peak over 0 decibels.  Quite often, but it doesn't bother me.  Because tonight I realized I'm not recording actual finished audio output.  I'm recording midi instructions for Ableton to store.  A simple, basic realization, but to me it was an exhilarating breakthrough.

  When the midi is finished and saved, change the piano to one that plays 'more normally'.  Something softer, with lower volume, and the output volume can be reduced until none of the loudest parts redline.
  For this, I currently like MiniGrand x64, but using setting 01: Real Piano.

  Now the audio can be exported as music (a .WAV file in my case), and won't have clipping.  I might be mistaken, but it seems like this particular piano package came with the Hammer/Ableton.  The pictures below show both the main screen and the MiniGrand x64 toolbox screen, with the MiniGrand x64 being found under "Plug-Ins".  There are some other pianos under Plug-Ins, and some more under "Instruments".  Some probably came with Ableton, others were free ones found by Googling.  Even more got deleted, because many of the free ones I found online weren't very good.

One final tip, for screen-grabbing on my HP laptop...  Hold Windows key+Shift+S to copy an image into memory.  Open a graphic program like IfranView, and paste the image onto the page (or hit Ctrl+V).  The resulting image can be saved to your hard drive.  From there, I copy the files onto a USB drive then transfer them to my main computer.  Since the laptop is ONLY for Ableton, this is a simple low-resource way to get screenshots from one computer to the other.
(I could have used Drop Box, Google Drive, email, or other online tricks, but the laptop struggles to keep up with Ableton already.  Trying to run more software just bogs it down.)
    NOTE:  I've since learned how to use Google Drive, in it's simplest browser version.  It's made transferring files a lot easier.)

This is a pretty boring post, but it's exciting news to me.  It has the added advantage of acting as a guide for myself in the future.  Just in case I forget.  :^)

Recent Posts